Why Chimney Flashing Repair Is Critical for Your Home’s Protection
Chimney flashing repair is one of the most important maintenance tasks that can prevent thousands of dollars in water damage to your home. When flashing fails, water seeps into your roof system, causing structural damage, mold growth, and costly repairs that could have been easily avoided.
Quick Answer: Essential Steps for Chimney Flashing Repair
- Inspect for rust, cracks, gaps, or loose sections
- Remove damaged flashing carefully
- Clean the chimney base thoroughly
- Install new base flashing, step flashing, and counter-flashing
- Seal all joints with high-quality polyurethane sealant
- Test the repair with water to ensure no leaks
The research shows that ignoring chimney flashing problems leads to severe consequences. Water damage can cost homeowners between $1,000 to $12,000 in repairs when flashing issues are left unaddressed. Regular inspections every two years can catch problems early, and proper repairs typically cost just $300 to $700.
What makes flashing fail? Poor installation, harsh weather, aging materials, and house settling all contribute to deterioration. Common signs include water stains on ceilings near your fireplace, rust on the flashing itself, and gaps between the flashing and chimney.
For homeowners seeking reliable residential roofing services, understanding chimney flashing basics helps you make informed decisions about maintenance and repairs.
I’m Gerald Michaels, founder of Adept Construction, Inc., and I’ve been helping Chicago area homeowners with chimney flashing repair and roofing solutions for nearly three decades. My experience has shown me that proper flashing installation and maintenance is the difference between a dry, secure home and costly water damage repairs.

Basic Chimney flashing repair vocab:
Understanding Chimney Flashing: Your Home’s Critical Seal
Picture your chimney standing proudly on your roof like a sentinel. It’s doing its job perfectly, channeling smoke and protecting your family. But there’s one vulnerable spot where this sturdy structure meets your roofline – and that’s exactly where chimney flashing repair becomes absolutely critical.
Chimney flashing is your home’s invisible guardian, a carefully designed system of metal sheets and sealants that creates a watertight barrier around your chimney. Think of it as a custom-fitted raincoat that wraps around the base of your chimney, ensuring every drop of water flows away from your home instead of sneaking inside.
The materials matter more than you might think. Galvanized steel offers durability at a reasonable cost, while aluminum resists corrosion beautifully. For the ultimate in longevity, copper flashing can last decades – though it comes with a higher upfront investment.
When flashing works properly, you probably never think about it. But when it fails? That’s when the real problems begin.
Water intrusion through damaged flashing doesn’t just create a few drips. It launches a chain reaction that can compromise your entire home’s structural integrity. That innocent-looking leak can saturate your attic insulation, forcing your heating and cooling system to work overtime and driving up your energy bills.
The hidden damage is often the worst part. Water doesn’t stay put – it travels along beams, soaks into roof decking, and creates the perfect environment for mold growth. What started as a small flashing problem can quickly become a health hazard for your family.
The consequences of neglecting flashing issues extend far beyond a stained ceiling. You’re looking at potential rotted roof decking that can compromise your entire roof structure. Mold and mildew don’t just damage your property – they can trigger respiratory problems and allergies. Some homeowners find too late that what seemed like a minor leak has actually weakened the wooden framework of their home.
Here’s the good news: proper maintenance and timely repairs can prevent all of this. Well-maintained flashing significantly extends your roof’s lifespan and protects your investment. When you stay on top of flashing maintenance, you’re not just preventing leaks – you’re preserving your home’s value and your family’s health.

Identifying Flashing Failure: Causes and Telltale Signs
Your chimney flashing might look sturdy from the ground, but it’s constantly battling forces that would make even the toughest materials surrender over time. Think of it as a loyal guard that never gets a break – eventually, even the best guards need backup.
Poor installation is often the silent culprit behind early flashing failure. When contractors rush the job or lack proper training, they might skip crucial steps like overlapping pieces correctly, securing nails properly, or creating adequate seals. Sometimes the flashing isn’t properly recessed into mortar joints, leaving gaps that practically invite water inside. It’s like building a fence with missing boards – water will find those weak spots every time.
Weathering and natural aging take their toll on even perfectly installed flashing. Your roof endures scorching summer heat, freezing winter cold, driving rain, and everything in between. This constant cycle of expansion and contraction gradually weakens metal and causes sealants to dry out and crack. Rust and corrosion become inevitable enemies, especially with galvanized steel flashing, where moisture creates those telltale reddish-brown stains that signal trouble.
Your home’s natural settling over the years can stress flashing connections, causing them to pull away from the chimney or roof surface. Meanwhile, cracked sealant around joints creates entry points for water, and in colder climates, ice dams can trap melting snow and force water under shingles and flashing.
So how do you spot trouble before it becomes a disaster? Water stains on ceilings near your fireplace are often the first red flag – those yellowish or brown discolorations, drips, or peeling paint mean water has already found its way inside.
Don’t wait for indoor signs, though. Visible gaps or cracks between flashing and chimney, loose or lifted flashing sections, and rust or deterioration on the metal itself are all clear warnings. Pay attention to damaged shingles around the chimney – missing, cracked, or curled shingles often indicate water damage from failing flashing.
Your nose can be a detective too. Musty odors in the attic or near the chimney suggest hidden moisture problems, while visible mold or mildew on chimney masonry, nearby wood, or attic insulation confirms that water intrusion is already causing damage.
The key is catching these problems early through regular inspections. A small chimney flashing repair today can prevent thousands of dollars in water damage tomorrow.

A Step-by-Step Guide to Chimney Flashing Repair
If you’re comfortable working on roofs and have solid DIY skills, chimney flashing repair can be a rewarding project that saves you hundreds of dollars. That said, this isn’t a job for beginners – you’ll be working at heights with potentially dangerous tools, and mistakes can lead to bigger problems down the road.
Before we dive in, let me be crystal clear about safety: never attempt this work alone. Always have someone spotting you, use proper safety equipment, and if you’re not 100% confident, call a professional. Your safety is worth more than any money you might save.
Tools and Materials You’ll Need
Nothing’s more frustrating than getting halfway through a roof repair and realizing you’re missing a crucial tool. Trust me, I’ve seen homeowners make multiple trips up and down ladders because they didn’t prepare properly. Here’s what you’ll need to gather before you even think about climbing up there.
Your safety gear should include a safety harness (this isn’t optional for roof work), sturdy work gloves to protect against sharp metal edges, safety goggles, and a reliable extension ladder that extends at least three feet above your roof line.
For tools, you’ll need a pry bar for removing old flashing without damaging surrounding materials, a wire brush for cleaning the chimney base, a hammer for securing new flashing, tin snips for cutting metal to size, a caulk gun for applying sealant, and a measuring tape for accurate cuts. If you’re dealing with counter-flashing that needs to be embedded in mortar joints, you might also need a grinder with a diamond blade.
Material selection is crucial for a lasting repair. You’ll need new flashing material – whether galvanized steel for budget-conscious repairs, aluminum for moderate durability, or copper for the longest-lasting solution. Don’t skimp on the sealant; high-quality polyurethane roofing sealant is worth the extra cost because it stays flexible in all weather conditions. You’ll also need corrosion-resistant roofing nails and consider picking up some self-adhering roofing membrane for an extra layer of protection.
A Guide to DIY Chimney Flashing Repair
Once you’ve assembled everything and double-checked the weather forecast (you want at least 24-48 hours of dry weather), it’s time to tackle the actual chimney flashing repair. This process requires patience and attention to detail – rushing through it will likely mean doing it again sooner than you’d like.
Start with thorough roof safety preparation. Set up your ladder on solid, level ground, maintain three points of contact while climbing, and use your safety harness once you’re on the roof. Take a few minutes to get comfortable with the roof pitch and identify the safest areas to step.
Conduct a detailed inspection of the entire flashing system before removing anything. Look for rust spots, cracked sealant, loose sections, and any signs of water damage to the surrounding wood. This helps you understand exactly what needs replacing versus what might just need resealing.
Removing old flashing requires a gentle touch. Use your pry bar carefully to avoid damaging the chimney masonry or surrounding shingles. Old sealant can be stubborn – a utility knife heated by the sun works better than trying to scrape it off cold. Clean everything thoroughly with your wire brush, removing all debris, old sealant, and loose mortar. A clean surface is absolutely critical for proper adhesion.
The installation process follows a specific layered approach that mimics how water naturally flows down your roof. Start by applying a strip of self-adhering membrane around the chimney base – think of this as insurance against any future leaks.
Base flashing goes on first at the front of the chimney. Cut your flashing to extend at least 4 inches onto the roof and 6 inches up the chimney face. Bend it carefully to follow the roof line and chimney angle, then secure it to the roof deck with roofing nails. Never nail into the chimney itself – this prevents the natural expansion and contraction that occurs with temperature changes.
Step flashing is where many DIY repairs go wrong, so take your time here. Each L-shaped piece gets woven between the shingle courses along the chimney sides. Install one piece under each shingle, overlapping the piece below it by at least 2 inches. The key is creating that shingle-like water-shedding effect – water should never be able to flow backward under the flashing.
If your chimney is wider than 24 inches, you’ll need a chimney saddle (also called a cricket) behind it. This small peaked structure diverts water around the chimney rather than letting it pool behind it. Building one requires some carpentry skills, so this might be where you consider calling in professional help.
Counter-flashing is the final metal component, covering and protecting all the base and step flashing below. This piece typically gets embedded into the chimney’s mortar joints. You’ll need to cut shallow grooves (about 1 inch deep) into the mortar, insert the flashing, and secure it properly.
For a detailed visual guide on this complex process, we recommend this tutorial on leakproof flashing.

Sealing for a Watertight Finish
The metal flashing does most of the heavy lifting, but proper sealing is what makes the difference between a repair that lasts two years and one that lasts twenty. This final step requires patience – resist the urge to rush through it.
Apply your polyurethane sealant generously along every joint, seam, and edge where flashing meets chimney or roof. Pay special attention to the top edge of counter-flashing where it enters the mortar joint – this is a common failure point. Don’t be stingy with the sealant; it’s much cheaper than doing this job twice.
Tool the sealant with a caulk tool or your gloved finger to create smooth, even beads that completely fill all gaps. This isn’t just about appearance – properly tooled sealant performs better and lasts longer than sealant that’s just squeezed from the tube.
Allow the sealant to cure completely according to the manufacturer’s instructions before exposing it to moisture. Most quality sealants need 24-48 hours of dry conditions to reach full strength.
Finally, test your work with a garden hose. Start at the bottom and work your way up, thoroughly soaking each section while someone checks for leaks from inside the attic. If you find any leaks, mark their location and apply additional sealant once everything dries out.
Even small chimney flashing repair projects can become complex quickly. If you encounter extensive damage, structural issues, or feel overwhelmed at any point, don’t hesitate to contact professionals who have the experience and tools to ensure a lasting repair.
DIY vs. Professional Chimney Flashing Repair: Making the Right Call
Picture yourself standing in your driveway, looking up at that chimney, wondering if you should tackle the chimney flashing repair yourself or pick up the phone to call a pro. It’s a decision that keeps many homeowners up at night, especially when they’re trying to balance their budget with their peace of mind.
Assessing the DIY Chimney Flashing Repair Project
There’s something undeniably appealing about rolling up your sleeves and fixing something yourself. Cost savings are probably the biggest draw – when professional repairs can run anywhere from $300 to $700 (and sometimes over $1,000 for complex jobs), doing it yourself means you’re only paying for materials. That’s real money back in your pocket.
Beyond the financial benefits, there’s that wonderful sense of accomplishment that comes with successfully completing a home repair project with your own two hands. Plus, when you spot a leak, you can take immediate action without waiting days or weeks for a contractor’s schedule to open up.
But let’s be honest about the flip side. Safety risks are no joke when you’re working on a roof. Falls can happen in a split second, and the consequences can be life-changing. If your roof has a steep pitch or you’re dealing with heights that make you nervous, those risks multiply quickly.
Then there’s the potential for improper installation. Chimney flashing isn’t just about slapping some metal and caulk around your chimney. It’s a sophisticated, layered system designed to shed water in very specific ways. One small mistake – maybe the step flashing isn’t overlapped correctly, or the counter-flashing isn’t sealed properly – and you could end up with worse problems than when you started.
You’ll also need specialized tools for certain aspects of the job. Cutting into mortar joints for counter-flashing, for example, requires tools that most homeowners don’t have sitting in their garage. And let’s not forget the time and effort involved. This isn’t a Saturday afternoon project – it requires patience, attention to detail, and often multiple trips up and down that ladder.
When to Call a Professional Roofer
Sometimes the smartest DIY decision is knowing when not to DIY. Extensive roof or chimney damage is a clear signal to call in the experts. If you’re seeing significant wood rot, widespread shingle damage, or the chimney masonry itself is deteriorating, you’re looking at problems that go way beyond simple flashing repair.
Steep roof pitches are another red flag. Professional roofers have specialized safety equipment and years of experience working on challenging roof angles. It’s just not worth the risk for most homeowners.
Have you already tried a DIY repair and you’re still seeing persistent leaks? That’s your roof telling you the problem is more complex than it initially appeared. Sometimes what looks like a simple flashing issue is actually part of a larger roofing system problem.
If you need a full flashing replacement – maybe the existing flashing is completely rusted through or was improperly installed from the start – you’re looking at a much more involved process. This typically requires removing significant portions of roofing materials and potentially addressing underlying structural issues.
And honestly, if you’re just not feeling confident about the project, that’s perfectly okay. Your safety and your home’s integrity are worth the investment in professional help.
For guaranteed results, expert handyman roof repair services are the safest bet. Professionals in areas like Downers Grove and Naperville have the right equipment and experience for a lasting solution. We understand the nuances of various roofing systems and how to integrate flashing seamlessly for maximum protection.
Frequently Asked Questions about Chimney Flashing
As a family-owned roofing company, we’ve answered thousands of questions about chimney flashing repair over the years. Here are the ones that come up most often during our conversations with homeowners:
How often should I inspect my chimney flashing?
You should perform a visual inspection from the ground seasonally and have a professional inspect it up close annually or after any severe storm. This proactive approach helps catch minor issues before they become major leaks.
Think of it like checking your car’s oil – a little attention now prevents big problems later. From ground level, look for obvious signs like rust stains, gaps, or loose sections. But here’s the thing: what you can see from the ground is just the tip of the iceberg.
A professional inspection gets up close to check for subtle issues that homeowners typically miss. We look for hairline cracks in sealant, early signs of corrosion, and whether the flashing is still properly secured. These annual checkups are especially important after our harsh Chicago winters, when ice dams and freeze-thaw cycles can wreak havoc on roofing systems.
Can I just use roofing tar or cement to fix a leak?
While often used as a quick fix, roofing tar and cement are only temporary solutions. They dry out, crack, and pull away from the chimney surface, inevitably leading to leaks again. A proper repair uses integrated metal flashing and flexible, high-grade sealant for long-term protection.
I get it – when you see water dripping into your living room, you want to slap something on there fast. But roofing tar is like using duct tape to fix a broken pipe. It might hold for a while, but it’s not addressing the real problem.
These quick-fix materials can’t handle the constant expansion and contraction that happens where your chimney meets your roof. Temperature changes, house settling, and weather exposure cause them to fail repeatedly. You’ll end up spending more money on multiple “fixes” than you would on doing it right the first time.
Professional chimney flashing repair uses a layered system of metal flashing and high-quality polyurethane sealants that move with your house and last for decades.
What is the average cost of a professional chimney flashing repair?
The cost can vary, but homeowners can typically expect to pay between $300 and $700 for minor repairs and resealing. A complete replacement, especially if there is underlying wood rot, could cost $1,000 or more.
Here’s how we typically break it down: minor repairs involving resealing joints, patching small holes, or securing loose sections usually fall in the $300-$500 range. moderate repairs that require replacing sections of step flashing or counter-flashing typically run $500-$700.
Complete flashing replacement is where costs can climb above $1,000, especially if we find rotted roof decking or structural damage that needs addressing first. But here’s the perspective that matters: even a $1,000 flashing replacement is a fraction of what you’ll pay to repair water damage throughout your home.
We’ve seen homeowners spend $5,000-$15,000 fixing water damage that started with a $400 flashing repair they put off. At Adept Construction, we always provide free estimates so you know exactly what you’re looking at before any work begins.
Protect Your Home with Expert Roofing Services
Your home’s chimney flashing repair isn’t just about fixing a leak – it’s about protecting one of your biggest investments. While this comprehensive guide can help you understand the process and tackle minor repairs, sometimes the smartest DIY decision is knowing when to call in the experts.
Think of it this way: you wouldn’t perform surgery on yourself just because you watched a medical show, right? Complex flashing issues require the same level of professional expertise. A small mistake in installation can turn a $500 repair into a $5,000 disaster involving rotted roof decking, mold remediation, and interior repairs.
When professional help makes the difference: If you’re dealing with extensive damage, steep roof pitches, or persistent leaks that keep coming back despite your best efforts, it’s time to bring in someone with decades of experience. Professional roofers have specialized tools, safety equipment, and the know-how to spot underlying issues that might not be obvious to the untrained eye.
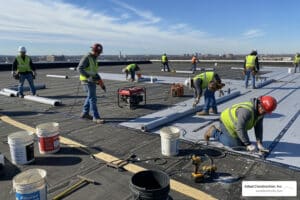
For homeowners in the Chicagoland area, Adept Construction, Inc. has been the go-to choice for chimney flashing repair and comprehensive roofing solutions for nearly three decades. As a family-owned company, we understand that your home is more than just a building – it’s where your family creates memories and finds shelter.
Our team specializes in residential roofing services that go beyond quick fixes. We believe in doing the job right the first time, using high-quality materials and proven techniques that stand up to Chicago’s challenging weather conditions. From minor flashing repairs to complete roof replacements, our knowledgeable staff takes pride in superior customer service and workmanship that earns strong local referrals.
Don’t let a small leak become a big headache. Contact us today for a free, no-obligation estimate on your roof repair in Downers Grove, IL. Whether you’re dealing with a minor flashing issue or need a complete roofing overhaul, our experienced team is ready to help protect your home the right way.
When it comes to your roof, an ounce of prevention truly is worth a pound of cure. Let us help you keep your family dry and your home secure for years to come.